The main switch controls the operating mode of the camera LEDs:
| Disabled | If deactivated, the LEDs blink only when the camera is starting. Beyond that, the LEDs will not signal anything. |
|---|---|
| Individual Configuration | In this operating mode, you can select one of the functions for all LEDs or you can link individual functions to specific LEDs. |
| Standard Configuration | The camera uses a permanently lit LED 0 to signal that it is running. In case of an error, this LED will blink. LED 1 signals the different recording modes. All other LEDs are off. This is the factory default setting. |
| Transparency Mode | In this mode, LED 0 flashes twice every three seconds. In addition to the recording status, LED 1 or LEDs 1 and 5, respectively, are signaling live image access. |
You can assign the same function to all LEDs:
| Differently | Select this option to assign different functions to the the LEDs. | ||||||||
|---|---|---|---|---|---|---|---|---|---|
| Preset | Select this option to set all LEDs as described for the individual models in the Designation of the Camera LEDs section. | ||||||||
| Other Options | Sets all LEDs at once to the desired LED signal. |
| Note: | The selected settings may be overruled temporarily by certain applications, e.g. while installing a software update. |
|---|
This parameter allows setting different brightness levels for the illumination LEDs:
| Off | The illumination LEDs are always off. |
|---|---|
| 1..14 | The illumination LEDs are using the selected brightness level. |
| Max | The illumination LEDs are always using the maximum brightness level. |
| Automatic | The illumination LEDs are off while the camera detects sufficient brightness. The camera automatically activates the LEDs if it starts getting dark and increases their intensity as it gets darker. |
This parameter allows setting different brightness levels for illuminating the camera buttons:
| Off | The button illumination is always off. |
|---|---|
| On | The button illumination is always on. |
| Automatic | The button illumination is off if the illumination LEDs are off. Button illumination will be switched on, if the illumination LEDs are using at least brightness level 1. |
You can link an external source of light to the button illumination using a signal output:
| Off | The external illumination is always off. The signal outputs can also be controlled via other camera systems. |
|---|---|
| Signal Out 1 (Do) | Signal output 1 (Do) is switched on together with the button illumination. This signal output is switched off together with the button illumination. |
| Signal Out 2 (eLi) | Signal output 2 (eLi) is switched on together with the button illumination. This signal output is switched off together with the button illumination. |
| Signal Out 3 (iLi) | Signal output 3 (iLi) is switched on together with the button illumination. This signal output is switched off together with the button illumination. |
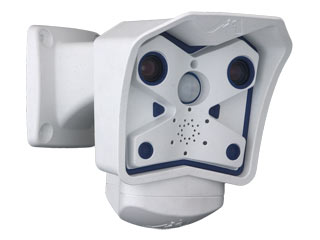
Designation of the Camera LEDs
LEDs of the MOBOTIX M12
The MOBOTIX M12 has six LEDs:
|
Preset LED functions:
|
 |
 |
LEDs of the MOBOTIX D12
The MOBOTIX D12 has four LEDs:
|
Preset LED functions:
|
 |
 |
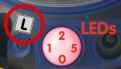
LEDs of the MOBOTIX M2x
The MOBOTIX M2x has two LEDs:
|
Preset LED functions:
|
 |
 |
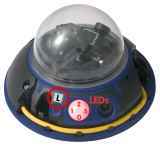
LEDs of the MOBOTIX D2xM
The MOBOTIX D2xM has two LEDs:
|
Preset LED functions:
|
 |
 |
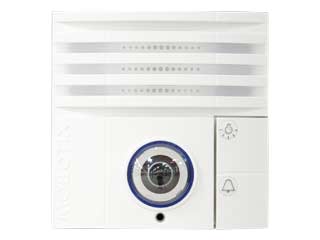
LEDs of the MOBOTIX Q2xM
The MOBOTIX Q2xM has two LEDs:
|
Preset LED functions:
|
 |
 |
LEDs of the MOBOTIX T24
The MOBOTIX T24 has two LEDs:
|
Preset LED functions:
|
 |
LED Signals
You can assign a different signaling function to every LED:
| Signal | Meaning |
|---|---|
| Off |
The LED's signal feature is deactivated during regular operation. Note: This setting will be ignored during camera startup. |
| on | The LED is on without interruption. |
| Web Access | The LED lights up when the camera's web server is being accessed. |
| Accessing Live Images | The LED lights up when the camera's live image is being accessed. |
| Blink | The LED blinks slowly. |
| Flash | The LED blinks rapidly. |
| event | The LED signals events as set by the LEDs parameter in the General Event Settings dialog (you may have to click More to display this parameter). |
| Left button | The LED lights up when you press the L key on the camera's front. |
| Right button | The LED lights up when you press the R key on the camera's front. |
| Ethernet | The LED signals activity on the Ethernet interface. |
| Camera | The LED shows the activity of the image sensors. Slow blinking indicates long exposure times. |
| VoIP/ISDN |
The LED signals activity on the ISDN interface or a VoIP connection. LED Signals When in VoIP Mode:
If a voice connection has been established via the VoIP (SIP) or ISDN interfaces, the LEDs signal the following:
|
| PIR | The LED indicates if an event has been triggered by the passive infrared detector. |
| Signal Input | The LED lights up when the signal input is active. |
| Signal output | The LED lights up when the signal output is active. |
| Serial interface | The LED signals activity on the serial (RS232) interface. |
| Notes: |
|
|---|
Other Settings
| PIR Threshold |
Define the trigger level for the passive infrared detector.
|
|---|
Storing the Configuration
Click on the Set button to activate your settings and to save them until the next reboot of the camera.
Click on the Factory button to load the factory defaults for this dialog (this button may not be present in all dialogs).
Click on the Restore button to undo your most recent changes that have not been stored in the camera permanently.
Click on the Close button to close the dialog. While closing the dialog, the system checks the entire configuration for changes. If changes are detected, you will be asked if you would like to store the entire configuration permanently.
| cn, de, en, es, fr, it, jp |
© 2001-2024 MOBOTIX AG, Germany · http://www.mobotix.com/